Another "Roy Roach" 28 Drag IV to test..............

whipper

Well-Known Member
Joined
Jan 31, 2006
Messages
5,408
Points
63
Location
prince george b.c. canada
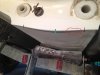
i would try to fix that yourself first with MarineTech. Your not going to make it worse. If that doesn't work out then take it to Jack or Darris.You can see the out line in your Last pic. Just follow that from the edges as best ya can. i use wood Coffee stir sticks works good for application and some straight edging. Put just a little more than you need on then when its harder sand to shape very slow and carefully. Your going to get closer than you think. Good lighting and take your time stop and measure. As mentioned above you dont need to run above the pad with a 3.0Lt anyway compared to a 2.5. Those scratches. What i do is use my finger. i just rub some in them all so there covered. After im done I wetsand 400 4 or 5 ft back on the pad anyway and they all come out great. You just have to run your fingers over them and make sure you've smoothed them all out. While your under there hit every little chip you see with Marine tech. wonder stuff! Darris uses it also. I have no lip now but tryed many different pad configurations. my pad is also a little flatter with rolled edges. Great for coming off speed. I had no choice but to do it my self were I live. But i found it interesting you may not..:D Another thing is your going to want to make sure that chip is dry inside!! I would stick a heat lamp on it over night before I marine teched it if you chose to try it.
 

K-DAWG XB 2003

Well-Known Member
Staff member
Joined
Aug 24, 2006
Messages
1,195
Points
48
Location
Kingsland, GA.
Well, I had a small jar of Marine Tex in the cabinet. I used it to seal up some hole from the old trolling motor years ago. Any how I mixed it up smeared that crap on all of the chips and applied a large amount to the pencil roll area. I need to get another jar to do some touch up work. But, So far so good. I set a light up behind the boat to cast a shadow so you can see the pencil roll. I am currently at .070 in the center gradually tapering out to nothing. I still need to apply some in the areas the large chips were at. The light is set up on the port (left ) side so, it casts the shadow to the STBD (right) side a little bit.


suicidealli

Well-Known Member
Joined
Feb 20, 2008
Messages
4,206
Points
38
Location
Southern ky, lake Cumberland
If you have any questions give me a call. As always when you buy a new prop from you get one free tweaking to it.
More seat time will be beneficial as well. They are one of my favorite props. Amazing how well they work, and on so many different hulls.
 

K-DAWG XB 2003

Well-Known Member
Staff member
Joined
Aug 24, 2006
Messages
1,195
Points
48
Location
Kingsland, GA.
I just want to make sure I know what needs to be done before you tweak it. Obviously I have some issues to deal with pad wise and set up wise. Ill definitely let you have it back to make some final adjustments. Put the hook back in the pad and moved the engine to 1/2" below. Gonna run her this weekend and see how she runs. I think getting the hook back in the pad should help it carry the weight motor better. Not a lot of people to talk to about the set up with the Pro XS. Don't seem like many people want to get involved with set up advice on this combo. But, that's OK, Ill get her figured out.
 

TBuck2003

Moderator
Joined
Mar 31, 2005
Messages
1,391
Points
48
Location
Twinsburg, Ohio
K-Dawg looking good man. Just make sure it is even side to side from where it measures .070 in the middle. There are quite a few guys running that motor on 21's and they love it. Denver Wilson (PapasAllison) and Jim (Red Allison) both have said motor and really like them. Both are in 85-90 range with sportmasters with 1:62 gears... Good Luck.
 

K-DAWG XB 2003

Well-Known Member
Staff member
Joined
Aug 24, 2006
Messages
1,195
Points
48
Location
Kingsland, GA.
Well done with the pad. I'm at like .065 in the center tapering out to flat at the edges. Gonna take the family out tomorrow and hit the Sand Bar for a little while. So, I wont get a chance to run it. Going from .030 to .065 I wonder if I will be see a difference in how she handles just cruising with the family? Gonna go and check the pad to prop shaft height and adjust if needed. Gonna go with 1/2 under for now. Any tips?
 

whipper

Well-Known Member
Joined
Jan 31, 2006
Messages
5,408
Points
63
Location
prince george b.c. canada
Bring sand paper to the water with you. I had mine all measured up i thought but seemed to want to lean to one side to much. I just put the sand paper under the water in the shallows and took some down on the opposite side I needed her to lean until she ran level solo. It didnt take much to make a big difference. I called it fine tuning. :rolleyes:
 

whipper

Well-Known Member
Joined
Jan 31, 2006
Messages
5,408
Points
63
Location
prince george b.c. canada
Hears some info of a 250xs XB2003 owner that helped me way back. I kept this info just found it again. { If it's a 96 or earlier it would have 60 thousand all the way across except on the last inch on each where it's completely flat. After 96 the 2003 that I have measured are the same as above only they have 90 thousands. Take a small strait edge 12" long and wrap friction tape around one ene of it. If your boat is a 96 or earlier put on approximately 60 thousands. if it's a late model put on 90 thousands. Put a feeler gauge right next to the tape to determine when you have 60 or 90 thousands. Now go to your boat and lay the end with the tape heading forward and the other end right to the back of the pad.}
 

K-DAWG XB 2003

Well-Known Member
Staff member
Joined
Aug 24, 2006
Messages
1,195
Points
48
Location
Kingsland, GA.
OK went for a boat ride today. Before I went I check the prop to pad height and adjusted. Since adding more lip to the pad it wasnt the same. I set the prop shaft to 1/4" below the pad. I was a 1/2" prior to adding lip to the pad I decide that since the 3.0 was heavier and I would be running with a load I would go ahead and move it to a 1/4" below and go from there. I had the family with me so I didn't get to string it out any. But, with the added lip. Here a some things I noticed. First the boat felt like it rode a lot higher up out of the water. Second it felt like it was more sensitive to trim. The boat responded to trim input much better that before. Third, boat seemed like it handle better. The back end felt lighter. The whole boat seemed to lean over more in turns than it did before. Anyhow I hope to get out alone sometime next week. I know more after a ride alone. Thoughts?????
 

whipper

Well-Known Member
Joined
Jan 31, 2006
Messages
5,408
Points
63
Location
prince george b.c. canada
Just be easy on the down button with the added stern hight thats about it. Sounds like your repair was a success.:) Depending were the load is motor lower but because motors heavier higher at the stern solo for sure. I had guy the same size as me so 230 yesterday. The two of us are 460 lbs at the helm. i lowered the motor because I blew out before with a big guy up there a few years back. I needed more trim to fly so lower helps the prop stay in the water cantilevering the bow with all that wieght up there! Thats another reason I want a 3.0lt you have better leverage with weight if placed correctly. More power does the same thing with smaller props I guess but..
 

K-DAWG XB 2003

Well-Known Member
Staff member
Joined
Aug 24, 2006
Messages
1,195
Points
48
Location
Kingsland, GA.
Can someone with a stock pad go and put a light behind it so it casts a shadow like in my pic and post it or send it to me in a PM? Thanks
 

xb03fs

Well-Known Member
Joined
Oct 17, 2008
Messages
2,370
Points
48
Location
STL
It looks pretty good to me, and the whole
Boat lifting is what it's supposed to do, sounds like a successful repair. You can take a little off one side of it leans at wot and you know the boat is loaded correctly. Very small amounts can make very noticably
Changed
 

whipper

Well-Known Member
Joined
Jan 31, 2006
Messages
5,408
Points
63
Location
prince george b.c. canada
Hear what I see. Were the green is looks not as pronounced as the other side and the lip flattens out sooner on that side. The lest side looks good. I have a pic some were sent to me ill try and dig it up for ya. Its from a XB03. What I see could also be the angle of the pic? If anything if this is the case I would take down the left side a little to match the right instead of build the right up since the rest looks great!!11666203_774945355938172_6371017262746878404_n.jpg
 

whipper

Well-Known Member
Joined
Jan 31, 2006
Messages
5,408
Points
63
Location
prince george b.c. canada
You will have to zoom in but this is a stock good lip. Also the right end of the pad were its work down I would add some there and try and get that turned down a little effect. The two ends have a little turn down at the corners. Also see how this one has a more rounded edge? Almost a bevelled edge. Darris told me once not to sharpen the edges he said round is better with a Lip. With no lip sharper. The water will angle better into the gearcase better rounded. Your there its just some fine tuning it looks like to me. Less abrupt from the pad to the lip. A smoother transition in other words and more on the left side than the right it looks like and the center then bevel the entire length of the lip a tinny bit. Your is very visable and they are usually harder to see like the pic i have. Thats mainly from the more gradual transition from the pad.
 
Last edited:

K-DAWG XB 2003

Well-Known Member
Staff member
Joined
Aug 24, 2006
Messages
1,195
Points
48
Location
Kingsland, GA.
Well here is the best picture I could get of the finished product. I again set a light up behind the pad so the lip would create a shadow.

 
Top